Equipment
OK.......after reading parts 1 and 2 of this series, we have arrived here with a clearly defined mission statement for why we are getting into reloading, we have reviewed the basic safety rules and understand the process on assembling ammunition.
Now we are going to look at some of the equipment you are going to need to be proficient in this craft. By the way, this is not intended to be a comprehensive listing of every tool you'll ever need for handloading; these are your bread and butter basics.
You start out by cleaning your brass. Vibratory tumblers have been on the market for a long time, are not too expensive and do a fair job cleaning your brass. They are used with either crushed walnut shell media or pulverized corncob media. You may add liquid brass polish to taste.
Ultrasonic cleaners for reloading are newer, and do a better job cleaning. They utilize a soapy water solution along with high frequency vibrations to clean the brass.
Stainless steel media cleaners are supposed to do the best job of cleaning, but will set you back some cash. They use miniature stainless steel sticks in a rotary tumbler to clean the brass. Cases that go through one of these come out looking brand new.
I do not have experience with any cleaning methods other than the traditional vibratory tumbler. The brass gets relatively clean, but probably not as good as with the other methods. I do not eat off of my brass, so this is plenty clean enough for me.
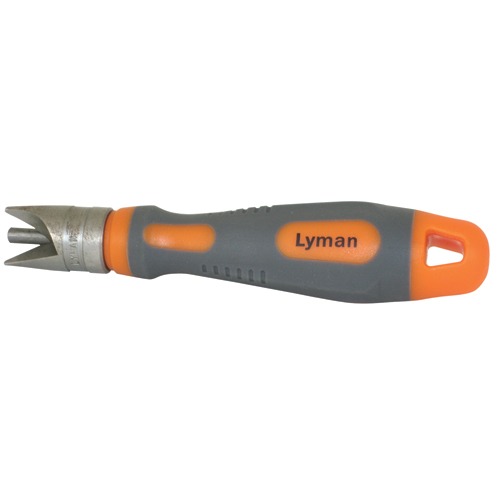
 |
| Lyman ultrasonic case cleaner |
 |
| Dillon Precision vibratory tumbler
A reloading press is going to be your biggest purchase. They are offered by a number of manufacturers.
|
 |
| RCBS Rock Chucker Supreme |
 |
| Redding Big Boss II |
 |
| Forster Co-Ax |
 |
| Dillon Square Deal "B" |
If you are choosing a single stage press, I recommend one that is constructed out of cast iron and features an "O" shaped frame. This will provide you with the rigidity needed to avoid frame deflection when you are re-sizing brass or doing custom case forming operations. Another nice feature is a spent primer collection system. This keeps the fired primers that you are popping out from falling onto the floor. If you will be loading long, magnum-length cartridges, make sure you choose a press that has a large enough frame opening and a ram with long enough stroke to accommodate your cartridge. I would not be concerned about the style of priming system built into the press, as I recommend using a hand priming tool.
If you elect to go with a progressive reloading press, I recommend the following:
- Get a press made by Dillon Precision. Their machines work well and their warranty policy is unbeatable. I have loaded with them, and I have never known anyone to say anything bad about them.
- Whatever progressive press you get, set it up for one caliber and do not disturb it once you get it adjusted. These machines can be switched from one caliber to another, but it is a slow process as well as a pain in the ass that will have you saying bad words by the time you are done. Once it is dialed in to your caliber, the only thing you will need to do is add primers and powder to it. If you have more than one caliber that you do volume loading for, get a second progressive press.
Do not expect to load ammo on a progressive press that has the same quality, reliability and uniformity as ammo that came off of a single stage press. Progressive presses are great for loading pistol practice ammo, but I would not trust my life to ammunition loaded on one. Choose whatever you like, but know the pros and cons before you buy.
Case trimmers come in several different flavors.


If you are going to be processing large quantities of brass, you will probably appreciate a trimmer with a power drive option, or a full blown powered case prep center like the red Hornady unit shown above. Plan to spend a lot of money if you want one of these. I have always made due with manual trimmers, but they can be a drag if you are doing more than a couple dozen cases at a time.
Case mouths need to be deburred after trimming. Use a tool like one of these.


I have both styles, and they both work well. I tend to prefer the ones with a handle for their better ergonomics.
A hand priming system is next.
 |
| RCBS Hand Priming Tool
A hand priming tool is the way to go for primer installation if you are not using a progressive press. They can be loaded with primers without having to touch them with your fingers. This is important, as oils from your skin will contaminate the priming compound and cause the primer not to fire. These tools also give an excellent "feel" when you are seating the primers compared to doing it on a press. The difference is like daylight and darkness; trust me on this.
Reloading dies can get your head spinning due to the vast amount of options on the market to choose from.
    For general purpose ammunition, a die set from any manufacturer will work out well. Any of them will load adequate ammo that suits most reloading purposes just fine. Some of the more expensive dies out there simply have cooler features that make them nicer to use, but you probably will not notice a difference in accuracy with them. If you eventually decide to get into precision handloading for extreme accuracy, check out the competition die sets from Forster or Redding. With respect to handgun reloading dies, you have the choice between steel and carbide sizing dies. Carbide dies cost more money, but do not require lubricant (in most cases) and cannot be scratched by debris on your brass. I highly recommend carbide dies over steel. If you shoot a bolt action rifle chambered for a bottleneck cartridge, you sometimes have the option of purchasing a neck sizing die (for most popular calibers). A neck sizing die is simply a re-sizing die that only squeezes down the diameter of the neck, not the body of the case. This is a viable method of sizing for ammo used in one gun only. Rounds that are neck sized sometimes exhibit greater accuracy due to the fact that they are already formed to the contours of the chamber, and keep the bullet centered in the chamber better. Bolts are the only action that will handle a neck sized round, due to their superior camming power during chambering. Neck sized brass will last significantly longer than full length sized brass, due to less work hardening. If you decide to full length resize, adjust your die to give a minimum shoulder bump only. If you are pushing the shoulder back more than .002", you are overworking the brass and creating excess cartridge headspace. This shortens the life of your brass, and hurts accuracy. Cartridge headspace sizing is best measured by a headspace gauge. This is not really considered a basic reloader's tool, but I wanted to mention it here to give you some context on the importance of correct re-sizing.  Powder measures are up next.   
Powder measures can be manually operated or electronic with a built-in scale. I have had good luck with RCBS measures, but other brands utilizing a metal housing will work fine too. I would stay away from the lower priced plastic housing models. The new electronic gizmos will set you back a hat full of money, and if they are like the electronic scales I have used, they can be temperamental with respect to air drafts, bench movements or vibrations and even florescent lighting. I tend to prefer the manual methods, but everybody wants high tech stuff these days, so make your choices and live with them.
Powder scales let us verify our powder charge weights.   
I have owned RCBS and Redding balance beam scales, and have owned and used several digital scales from various manufacturers. I prefer a good balance beam scale for weighing powder charges. Electronic scales have been nothing but trouble for me, but sometimes they can be helpful when weighing items of widely ranging weights, such as cartridge cases or cast bullets.
Powder tricklers are all about the same.....choose a color you like.
   
They all allow you to dribble the last few kernels of powder into the pan on the scale to achieve the desired charge weight. No rocket science here.....
The last basic item you need to have is a reloading manual.
  
In theory, you could squeak by with just one manual. In reality, you should have a minimum of three different reloading manuals to consult and compare. In addition to the load data in them, there are also exterior ballistics tables for determining trajectory and wind drift, as well as reloading tips and techniques. If you take the time to read them, they can provide you with quite an education in the field of handloading. I really cannot emphasize too highly how much a good set of reloading manuals will assist and educate you. Do not try to make do by scabbing information off the internet as your only information resource.
In a nutshell, we have covered the major equipment needs for the beginning reloader, and passed a couple of tips along to make life a little easier when you start out in this rewarding hobby. In a future post, I will assemble a list of advanced tips and techniques to carry you to the next level of precision in your handloading efforts.
LWM out................
|


No comments:
Post a Comment